基本所有的VPS服务器商家,都会提供免费的Linux系统供安装,比如CentOS、Debian、Ubuntu等。那为什么还要使用一键DD脚本重装/更换系统呢?
商家提供的系统版本有限,可能没有自己需要的版本。
商家的系统安装有自己不想要的服务,比如国内的阿里云盾(安骑士)。
商家的系统无法安装特定软件,比如很挑内核的锐速。
以上几种情况,一键DD脚本就可以为服务器更换一个纯净的系统,帮你解决问题。
所需环境
以网络流传较广的Vicer一键DD为例,其所需环境为:
架构:KVM/XEN,不支持OpenVZ。
系统:Debian/Ubuntu/CentOS
一键DD脚本使用教程
一方法
注意事项:
Vicer脚本目前不支持重装为CentOS 7系统,支持CentOS 6.9以下版本。
重装的系统源自官方发行版。
安装过程全自动进行,无需VNC操作,无需进入救援模式。
系统安装完成后的默认用户名为root,默认密码为: MoeClub.org
DD脚本示例:
由于脚本命令中需要写明目标系统版本,所以根据需求不同,最终的运行命令也各不相同。
下面提供几个使用范例,可以直接复制使用,也可以将命令中的系统版本替换为其它版本。
重装为CentOS:
以下命令中的 -c 后面为CentOS版本号,-v 后面为64位/32位,可根据需求进行替换。
# CentOS 6.10 64位:
bash <(wget --no-check-certificate -qO- 'https://www.moeelf.com/attachment/LinuxShell/InstallNET.sh') -c 6.10 -v 64 -a
# CentOS 6.10 32位:
bash <(wget --no-check-certificate -qO- 'https://www.moeelf.com/attachment/LinuxShell/InstallNET.sh') -c 6.10 -v 32 -a
重装为Debian:
以下命令中的 -d 后面为Debian版本号,-v 后面为64位/32位,可根据需求进行替换。
# Debian 8 64位:
bash <(wget --no-check-certificate -qO- 'https://www.moeelf.com/attachment/LinuxShell/InstallNET.sh') -d 8 -v 64 -a
# Debian 9 64位:
bash <(wget --no-check-certificate -qO- 'https://www.moeelf.com/attachment/LinuxShell/InstallNET.sh') -d 9 -v 64 -a
# Debian 10 64位:
bash <(wget --no-check-certificate -qO- 'https://www.moeelf.com/attachment/LinuxShell/InstallNET.sh') -d 10 -v 64 -a
# Debian 11 64位:
bash <(wget --no-check-certificate -qO- 'https://www.moeelf.com/attachment/LinuxShell/InstallNET.sh') -d 11 -v 64 -a
重装为Ubuntu:
以下命令中的 -u 后面为Ubuntu版本号,-v 后面为64位/32位,可根据需求进行替换。
# Ubuntu 12.04 64位:
bash <(wget --no-check-certificate -qO- 'https://www.moeelf.com/attachment/LinuxShell/InstallNET.sh') -u 12.04 -v 64 -a
# Ubuntu 14.04 64位:
bash <(wget --no-check-certificate -qO- 'https://www.moeelf.com/attachment/LinuxShell/InstallNET.sh') -u 14.04 -v 64 -a
# Ubuntu 16.04 64位:
bash <(wget --no-check-certificate -qO- 'https://www.moeelf.com/attachment/LinuxShell/InstallNET.sh') -u 16.04 -v 64 -a
# Ubuntu 18.04 64位:
bash <(wget --no-check-certificate -qO- 'https://www.moeelf.com/attachment/LinuxShell/InstallNET.sh') -u 18.04 -v 64 -a
# Ubuntu 20.04 64位:
bash <(wget --no-check-certificate -qO- 'https://www.moeelf.com/attachment/LinuxShell/InstallNET.sh') -u 20.04 -v 64 -a
关于系统重装过程
运行包含正确系统版本号的脚本后,新系统的安装会自动进行,无需人工干预。
可能的三种情况:
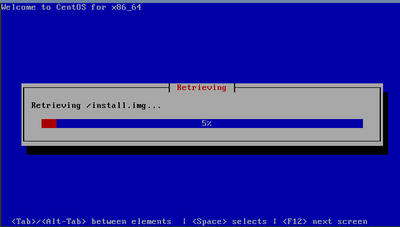
正常情况下10分钟左右就可以安装成功了,期间可以在VNC中观察安装过程:
如果安装CentOS 7版本,会出现下图提示,表示不支持:
如果输入了其它不支持或不存在的系统版本,则会出现下图提示,中止安装:
重装系统后更改root密码
耐心等待系统安装成功后,出于安全考虑,建议立即更改默认密码。
具体方法:
1、使用Putty以上文提供的默认密码登录,输入以下命令:passwd root
2、接下来会分两次要求输入新的密码,可以手动输入,也可以在其它位置复制一个密码,然后在Putty界面右键点击即可粘贴上去。
注意:输入新密码时并不会直接显示出来,光标也不会移动,这是正常的。
3、再次登录系统时,记得使用新的root密码。
二方法
安装重装系统的前提组件
Debian/Ubuntu:
apt-get install -y xz-utils openssl gawk file wget screen && screen -S os
RedHat/CentOS:

yum install -y xz openssl gawk file glibc-common wget screen && screen -S os
如果出现异常,请刷新Mirrors缓存或更换镜像源。
RedHat/CentOS:
yum makecache && yum update -y
Debian/Ubuntu:

apt update -y && apt dist-upgrade -y
一键智能安装脚本
一键DD脚本,支持性好,更智能更全面,支持国内外各种VPS重装,特别是对国内各种访问国外资源慢的VPS安装有奇效。
支持debian11.
发现很多人不知道怎么DD甲骨文,使用支持uefi的镜像包即可.脚本已添加3个甲骨文专用选项23-25.
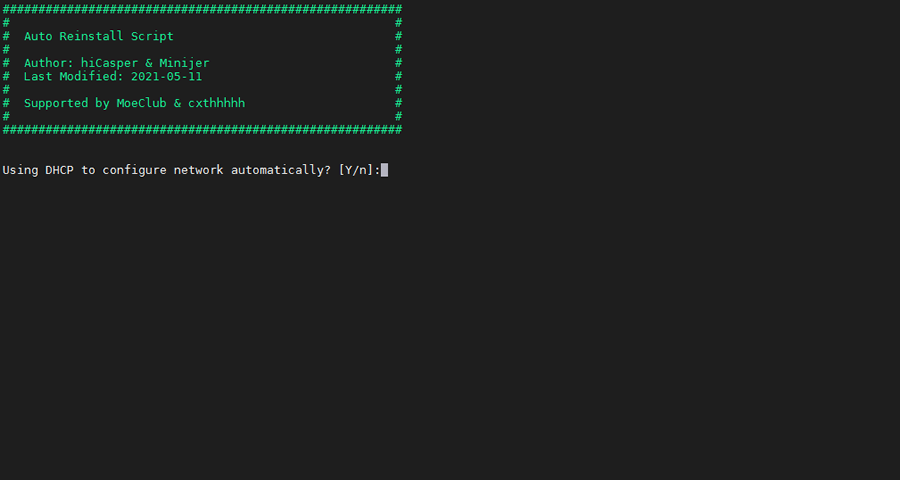
wget --no-check-certificate -O AutoReinstall.sh https://d.02es.com/AutoReinstall.sh && chmod a+x AutoReinstall.sh && bash AutoReinstall.sh

输入Y确认DD后主机自动获取IP,N则自行设置IP 输入N后会自动检测出主机现用IP,如果正确可以按Y确认使用,如不正确则按N自行按正确的输入。

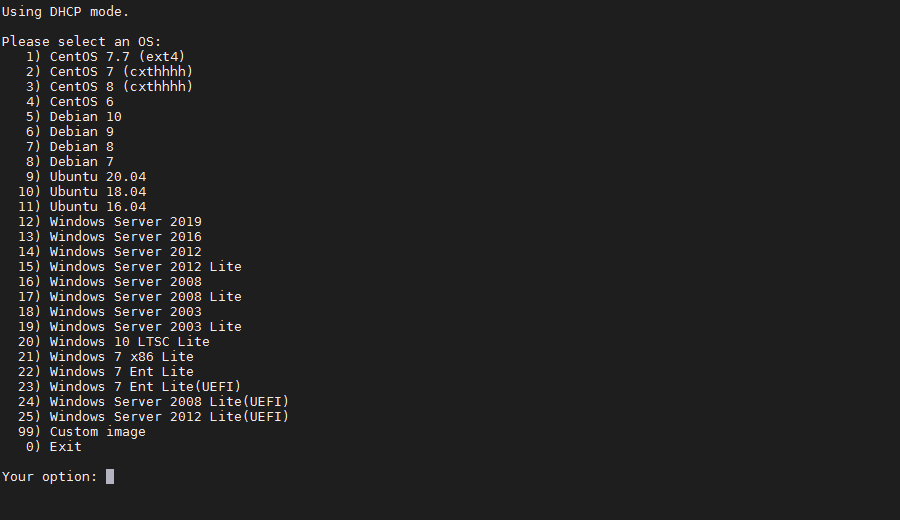
25合1的系统一键DD选择界面,输入99则使用自定义镜像。 以上系统密码不为默认密码的均为网络收集,如有疑虑使用自己的自定义镜像。
25合一系统密码:
1、CentOS 7.7 (已关闭防火墙及SELinux,默认密码Pwd@CentOS)
2、CentOS 7 (默认密码cxthhhhh.com)
3、CentOS 8 (默认密码cxthhhhh.com)
4、CentOS 6 (默认密码Minijer.com)
5、Debian 11 (默认密码Minijer.com)
6、Debian 10 (默认密码Minijer.com)
7、Debian 9 (默认密码Minijer.com)
8、Debian 8 (默认密码Minijer.com)
9、Ubuntu 20.04 (默认密码Minijer.com)
10、Ubuntu 18.04 (默认密码Minijer.com)
11、Ubuntu 16.04 (默认密码Minijer.com)
12、Windows Server 2019 (默认密码cxthhhhh.com)
13、Windows Server 2016 (默认密码cxthhhhh.com)
14、Windows Server 2012 (默认密码cxthhhhh.com)
15、Windows Server 2012 Lite (默认密码nat.ee)
16、Windows Server 2008 (默认密码cxthhhhh.com)
17、Windows Server 2008 Lite (默认密码nat.ee)
18、Windows Server 2003 (默认密码cxthhhhh.com)
19、Windows Server 2003 Lite (默认密码WinSrv2003x86-Chinese)
20、Windows 10 LTSC Lite (默认密码www.nat.ee)
21、Windows 7 x86 Lite (默认密码Windows7x86-Chinese)
22、Windows 7 Ent Lite (默认密码nat.ee)
23、Windows 7 Ent Lite (UEFI支持甲骨文)(默认密码nat.ee)
24、Windows Server 2008 Lite (UEFI支持甲骨文)(默认密码nat.ee)
25、Windows Server 2012 Lite (UEFI支持甲骨文)(默认密码nat.ee)
99、自定义镜像
注意:
经测试在谷歌云原版系统基础上DD会出现自动获取的子网掩码为255.255.255.255,如出现这种情况需要手工输入改正为正确的如255.255.255.0,否则会安装完成主机可能会离线。
Oracle Cloud(甲骨文云)可选择23-25一键DD,注意基础系统最好选择Ubuntu,如原系统是CentOS可能无法成功。
一键安装脚本(自定义DD包地址)
示例脚本,补全DD包直连地址后运行即可;
wget --no-check-certificate -qO InstallNET.sh 'https://d.02es.com/InstallNET.sh' && bash InstallNET.sh -dd '[Windows DD包直链地址]'
精简版DD包
如果没有自己的DD包,可以使用博主提供的包,从以下版本中选择自己需要的系统,然后输入一键脚本即可;
# DD Windows Server 2008 R2 64位 精简版 [账户Administrator密码nat.ee]
wget --no-check-certificate -qO InstallNET.sh 'https://d.02es.com/InstallNET.sh' && bash InstallNET.sh -dd 'https://d.02es.com/Windows/Win_Server2008R2_sp1_64_Administrator_nat.ee.gz'

# DD Windows Server 2012 R2 64位 精简版 [账户Administrator密码nat.ee]
wget --no-check-certificate -qO InstallNET.sh 'https://d.02es.com/InstallNET.sh' && bash InstallNET.sh -dd 'https://d.02es.com/Windows/Win_Server2012R2_64_Administrator_nat.ee.gz'

# DD Windows Server 2016 64位 精简版 [账户Administrator密码nat.ee]
wget --no-check-certificate -qO InstallNET.sh 'https://d.02es.com/InstallNET.sh' && bash InstallNET.sh -dd 'https://d.02es.com/Windows/Win_Server2016_64_Administrator_nat.ee.gz'

# DD Windows Server 2019 64位 精简版 [账户Administrator密码WinSrv2019dc-Chinese]
wget --no-check-certificate -qO InstallNET.sh 'https://d.02es.com/InstallNET.sh' && bash InstallNET.sh -dd 'https://d.02es.com/Windows/Win_Server2019_64_Administrator_WinSrv2019dc-Chinese.gz'

# DD Windows Server 2022 64位 精简版 [账户Administrator密码nat.ee]
wget --no-check-certificate -qO InstallNET.sh 'https://d.02es.com/InstallNET.sh' && bash InstallNET.sh -dd 'https://d.02es.com/Windows/Win_Server2022_64_Administrator_nat.ee.gz'

# DD Windows7 32位 精简版 [账户Administrator密码nat.ee]
wget --no-check-certificate -qO InstallNET.sh 'https://d.02es.com/InstallNET.sh' && bash InstallNET.sh -dd 'https://d.02es.com/Windows/Win7_86_Administrator_nat.ee.gz'

# DD Windows7 sp1 64位 企业精简版 [账户Administrator密码nat.ee]
wget --no-check-certificate -qO InstallNET.sh 'https://d.02es.com/InstallNET.sh' && bash InstallNET.sh -dd 'https://d.02es.com/Windows/Win7_sp1_64_Administrator_nat.ee.gz'

# DD Windows8.1 64位 专业精简版 [账户Administrator密码nat.ee]
wget --no-check-certificate -qO InstallNET.sh 'https://d.02es.com/InstallNET.sh' && bash InstallNET.sh -dd 'https://d.02es.com/Windows/Win8.1_64_Administrator_nat.ee.gz'

# DD Windows10 2016LTSB 64位 企业深度精简版 [账户Administrator密码nat.ee]
wget --no-check-certificate -qO InstallNET.sh 'https://d.02es.com/InstallNET.sh' && bash InstallNET.sh -dd 'https://d.02es.com/Windows/Win10_2016LTSB_64_Administrator_nat.ee.gz'

# DD Windows10 2019LTSC 64位 企业适量精简版 [账户Administrator密码Vicer]
wget --no-check-certificate -qO InstallNET.sh 'https://d.02es.com/InstallNET.sh' && bash InstallNET.sh -dd 'https://d.02es.com/Windows/Win10_2019LTSC_64_Administrator_Vicer.gz'
Windows服务器开启Ping功能,打开系统运行服务 Win+R 输入命令
## 开启Ping ##
netsh firewall set icmpsetting 8
## 关闭Ping ##
netsh firewall set icmpsetting 8 disable
常用工具下载(密码:02es.com)
版权属于:小杨的生活
本文链接:https://www.akkdiy.cn/archives/853/
转载时须注明出处及本声明
