前言
Netflix —— 大家也并不是很陌生,美国奈飞公司,我们经常简称它为网飞或是奈飞。它是一家会员订阅制的流媒体播放平台,成立于1997年,总部位于美国的加利福尼亚州。经常看奈飞的人,应该知道下面的五个概念:
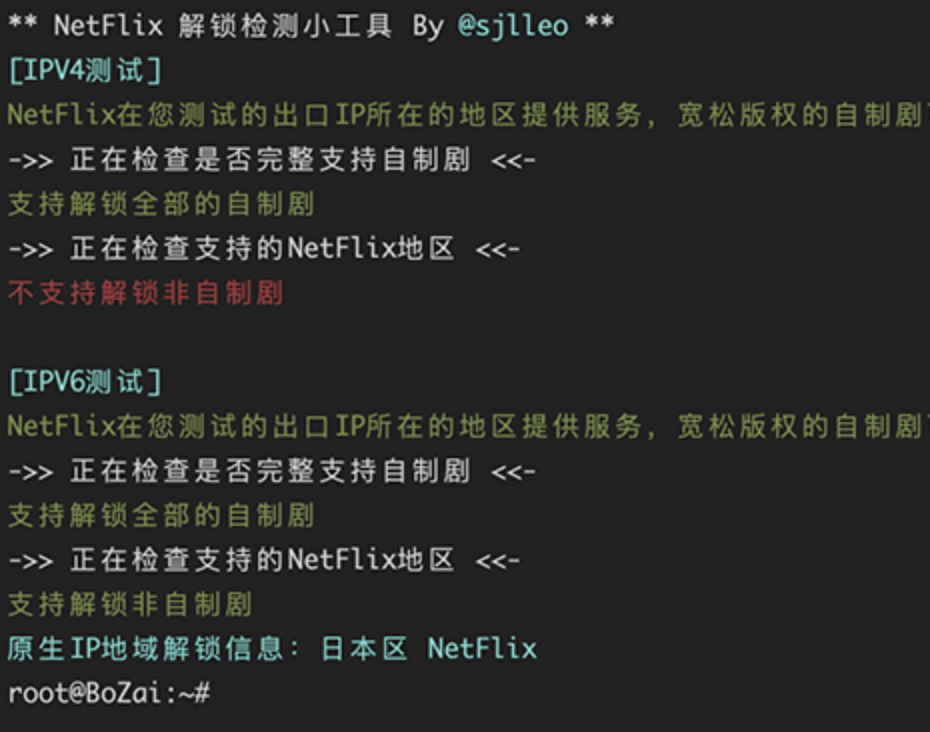
不提供服务 – 所在的地区奈飞没开通,连自制剧也看不了 宽松版权 – 有些奈飞拍摄的影片不是特别注重版权,所以限制放的很开 解锁自制剧 –
代表可以看由奈飞自己拍摄的影片 解锁非自制剧 – 代表可以看奈飞买下的第三方版权影片 地域解锁 –
奈飞在不同的地区可以看的片源都是不同的,有些影片只能在特定区观看
准备工作
1、VPS 一台,重置主流的操作系统(本期视频使用 Debian 的系统进行演示)
2、域名一个,做好相应的解析(用于搭建 Xray 节点]
3、奈飞会员账号一个
Netflix 解锁检测脚本
运行以下代码,即可查询自己的 VPS 是否支持奈飞全解锁或是半解锁!
奈飞 (Netflix) 解锁,分为自制剧解锁、非自制剧解锁、或是直接打不开奈飞 (Netflix) 页面。一般来说,电影上面有 N 符号,或是电影开始有 Netflix 标识的可认定为奈飞(Netflix) 的自制剧,其他的片源为奈飞(Netflix) 的非自制剧。非自制剧 ≥ 自制剧 > 看不了 … … 一般情况下,解锁了奈飞 (Netflix) 的非自制剧,所有的电影也就都能看了(当然,奈飞(Netflix) 的片源是分区的,解锁相应的地区就会有相应的电影)
wget -O nf https://github.com/sjlleo/netflix-verify/releases/download/2.01/nf_2.01_linux_amd64 && chmod +x nf && clear && ./nf

bash <(curl -L -s https://raw.githubusercontent.com/lmc999/RegionRestrictionCheck/main/check.sh)

warp一件安装加无限刷ip脚本
wget -N https://cdn.jsdelivr.net/gh/fscarmen/warp/menu.sh
安装 WireGuard
添加 backports 源
apt install curl lsb-release -y
echo "deb http://deb.debian.org/debian $(lsb_release -sc)-backports main" | tee /etc/apt/sources.list.d/backports.list
apt update
安装网络工具包
apt install net-tools iproute2 openresolv dnsutils -y
安装 wireguard-tools
apt install wireguard-tools --no-install-recommends
先执行 uname -r 命令查看内核版本。如果是 5.6 以上内核则已经集成了 WireGuard ,就不需要安装了。如果不是,执行下面的命令
apt -t $(lsb_release -sc)-backports install linux-image-$(dpkg --print-architecture) linux-headers-$(dpkg --print-architecture) --install-recommends -y
reboot     # 重启
生成 WireGuard 配置文件
wgcf 是 Cloudflare WARP 的非官方 CLI 工具,它可以模拟 WARP 客户端注册账号,并生成通用的 WireGuard 配置文件。
curl -fsSL git.io/wgcf.sh | bash    #  安装 wgcf
wgcf register                       #  注册 WARP 账户 (生成 /root/wgcf-account.toml 文件保存账户信息)
wgcf generate                       #  生成 /root/wgcf-profile.conf 配置文件
编辑 WireGuard 配置文件
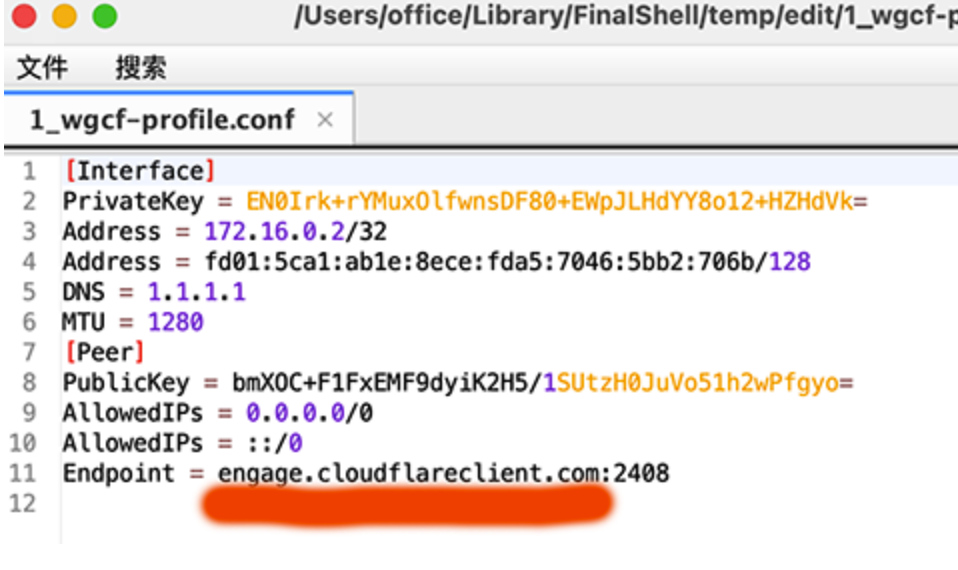
编辑 /root/wgcf-profile.conf 文件,其中可以在服务器端解析 engage.cloudflareclient.com 的 ip
nslookup engage.cloudflareclient.com
解析的结果为 162.159.192.1
将配置文件中的 engage.cloudflareclient.com 替换为 162.159.192.1 ,并删除 AllowedIPs = 0.0.0.0/0 。
即配置文件中 [Peer] 部分为:
[Peer]
PublicKey = bmXOC+F1FxEMF9dyiK2H5/1SUtzH0JuVo51h2wPfgyo=
AllowedIPs = ::/0
Endpoint = 162.159.192.1:2408
若你的 VPS 只有 IPv6,请看这里:
下面详细说了 IPv4 以及 IPv6 分别应该如何去做。
只有 IPv4 的服务器添加 WARP IPv6 网络支持
将配置文件中的 engage.cloudflareclient.com 替换为 162.159.192.1,并删除 AllowedIPs = 0.0.0.0/0。即配置文件中 [Peer] 部分为:
[Peer]
PublicKey = bmXOC+F1FxEMF9dyiK2H5/1SUtzH0JuVo51h2wPfgyo=
AllowedIPs = ::/0
Endpoint = 162.159.192.1:2408
原理:AllowedIPs = ::/0参数使得 IPv6 的流量均被 WireGuard 接管,让 IPv6 的流量通过 WARP IPv4 节点以 NAT 的方式访问外部 IPv6 网络。
此外配置文件中默认的 DNS 是 1.1.1.1,博主实测其延迟虽然很低,但解析结果并不理想。由于它将替换掉系统中的 DNS 设置 (/etc/resolv.conf),建议小伙伴们请根据实际情况来进行替换,或者直接删除 DNS 这行。以下配置供参考:
DNS = 8.8.8.8,8.8.4.4,2001:4860:4860::8888,2001:4860:4860::8844
只有 IPv6 的服务器添加 WARP IPv4 网络支持
将配置文件中的 engage.cloudflareclient.com 替换为 [2606:4700:d0::a29f:c001],并删除 AllowedIPs = ::/0。即配置文件中 [Peer] 部分为:
[Peer]
PublicKey = bmXOC+F1FxEMF9dyiK2H5/1SUtzH0JuVo51h2wPfgyo=
AllowedIPs = 0.0.0.0/0
Endpoint = [2606:4700:d0::a29f:c001]:2408
原理:AllowedIPs = 0.0.0.0/0参数使得 IPv4 的流量均被 WireGuard 接管,让 IPv4 的流量通过 WARP IPv6 节点以 NAT 的方式访问外部 IPv4 网络。
此外配置文件中默认的 DNS 是 1.1.1.1,由于是 IPv4 地址,故查询请求会经由 WARP 节点发出。由于它将替换掉系统中的 DNS 设置 (/etc/resolv.conf),为了防止当节点发生故障时 DNS 请求无法发出,建议替换为 IPv6 地址的 DNS 优先,或者直接删除 DNS 这行。以下配置供参考:
DNS = 2001:4860:4860::8888,2001:4860:4860::8844,8.8.8.8,8.8.4.4
测试 WireGuard 网络接口
将 WireGuard 配置文件复制到 /etc/wireguard/ 并命名为 wgcf.conf。
cp wgcf-profile.conf /etc/wireguard/wgcf.conf
开启网络接口(命令中的 wgcf 对应的是配置文件 wgcf.conf 的文件名前缀)。
wg-quick up wgcf
执行以下命令检查是否连通。同时也能看到正在使用的是 Cloudflare 的网络。
curl -6 ip.p3terx.com测试完成后关闭相关接口,因为这样配置只是临时性的
wg-quick down wgcf
启用 WireGuard 网络接口
systemctl start wg-quick@wgcf   # 启用守护进程
systemctl enable wg-quick@wgcf  # 设置开机启动
安装 Xray 面板
下面是安装 V2-UI 面板的官方命令
bash <(curl -Ls https://raw.githubusercontent.com/vaxilu/x-ui/master/install.sh)
修改 x-UI 配置
以下的配置是视频中说用的配置文件,大家可以照搬,或是自行修改。
{
  "api": {
    "services": [
      "HandlerService",
      "LoggerService",
      "StatsService"
    ],
    "tag": "api"
  },
  "inbounds": [
    {
      "listen": "127.0.0.1",
      "port": 62789,
      "protocol": "dokodemo-door",
      "settings": {
        "address": "127.0.0.1"
      },
      "tag": "api"
    }
  ],
  "outbounds": [
      {
      "protocol": "freedom",
      "settings": {
         "domainStrategy": "UseIPv6"
       },
      "tag": "IP-V6"
    },
    {
      "protocol": "blackhole",
      "settings": {},
      "tag": "blocked"
    }
  ],
  "policy": {
    "system": {
      "statsInboundDownlink": true,
      "statsInboundUplink": true
    }
  },
  "routing": {
    "rules": [
      {
        "type":"field",
        "domain": [
          "geosite:netflix"
        ],
        "inboundTag":  [
          "all-in"
         ],
        "outboundTag": "IP-V6"
      },
      {
        "inboundTag": [
          "api"
        ],
        "outboundTag": "api",
        "type": "field"
      },
      {
        "ip": [
          "geoip:private"
        ],
        "outboundTag": "blocked",
        "type": "field"
      },
      {
        "outboundTag": "blocked",
        "protocol": [
          "bittorrent"
        ],
        "type": "field"
      }
    ]
  },
  "stats": {}
}
若你是自建的 Xray ,不是用面板搭建的,可以通过修改 Xray 的配置文件,来进行 IPv6 的出口指定和路由设置。
centos系统安装
wget -N --no-check-certificate https://raw.githubusercontent.com/wxfyes/bt/master/kuaijie.sh && bash kuaijie.sh
在 VPS 目录 /etc/v2ray-agent/xray/conf 找到 xxx.json 文件,替换整个 outbounds ,请注意 "outbounds" 后面的标点符号 。
比如:找到如下图所示的地方,选中后,全部粘贴就好了。
     {
      "outbounds": [
        {
          "tag":"IP4_out",
          "protocol": "freedom",
          "settings": {}
        },
        {
          "tag":"IP6_out",
          "protocol": "freedom",
          "settings": {
            "domainStrategy": "UseIPv6"
          }
        }
      ],
      "routing": {
        "rules": [
          {
            "type": "field",
            "outboundTag": "IP6_out",
            "domain": ["geosite:netflix"] // netflix 走 IPv6,可以多写几个,比如 "domain": ["geosite:netflix","geosite:google"]
          },
          {
            "type": "field",
            "outboundTag": "IP4_out",
            "network": "udp,tcp"
          }
        ]
      }
    }

**回落至Nginx**
安装完毕以后,在VPS目录 /etc/v2ray-agent/xray/conf 找到 xxx.json 文件,贴入下面的配置文件


   {
 "inbounds": [
        {
            "listen": "0.0.0.0",
            "port": 443,   //监听的端口
            "protocol": "vless",
            "settings": {
                "clients": [
                    {
                        "id": "5272bc0d-9852-4af7-b2f0-979b1faf2973", //此处为你的UUID
                        "level": 0,
                        "email": "rabbit@akkdiy.cn",
                        "flow":"xtls-rprx-direct"
                    }
                ],
                "decryption": "none",
                "fallbacks": [
                    {
                        "dest": 31300  //默认回落端口
                    },
                    {
                        "alpn": "h2",
                        "dest": 31302  //https回落端口
                    }
                ]
            },
            "streamSettings": {
                "network": "tcp",
                "security": "xtls",
                "xtlsSettings": {
                    "serverName": "xxx.akkdiy.cn",  //你的域名
                    "alpn": [
                        "h2",
                        "http/1.1"
                    ],
                    "certificates": [
                        {
                            "certificateFile": "/usr/local/etc/xray/cert/cert.crt",
                            "keyFile": "/usr/local/etc/xray/cert/private.key"
                        }
                    ]
                }
            }
        }
    ],
修改 Nginx 配置文件
找到VPS目录 etc/nginx/nginx.conf 文件,修改如以下配置
user  root;
worker_processes  1;
#error_log  /etc/nginx/error.log warn;
#pid    /var/run/nginx.pid;
events {
    worker_connections  1024;
}
http {
    include       /etc/nginx/mime.types;
    default_type  application/octet-stream;
    log_format  main  '$remote_addr - $remote_user [$time_local] "$request" '
                      '$status $body_bytes_sent "$http_referer" '
                      '"$http_user_agent" "$http_x_forwarded_for"';
    #access_log  /etc/nginx/access.log  main;
    sendfile        on;
    #tcp_nopush     on;
    keepalive_timeout  120;
    client_max_body_size 20m;
    #gzip  on;
server {
    listen 127.0.0.1:31300;
    server_name  xxx.akkdiy.cn;
    root /usr/share/nginx/html;
    index index.php index.html index.htm;
}
 server {
    listen 127.0.0.1:31302 http2;
    server_name  xxx.akkdiy.cn;
    root /usr/share/nginx/html;
    index index.php index.html index.htm;
}
server {
    listen       0.0.0.0:80;
    server_name  xxx.akkdiy.cn;
    return 301 https://xxx.akkdiy.cn$request_uri;
}
}
设置 Nginx 开机启动,并重新启动 Nginx
systemctl enable nginx
systemctl restart nginx
检验Xray配置文件
systemctl restart xray  #重启xray服务
systemctl status xray  #查看xray运行状态
下载伪装网站及部署
默认的网站主程序文件夹在 /usr/share/nginx/html/ ,大家可以自行的替换里面的任何东西(整站程序)
rm -rf /usr/share/nginx/html/*
cd /usr/share/nginx/html/
wget https://github.com/V2RaySSR/Trojan/raw/master/web.zip
unzip web.zip
systemctl restart nginx
到此,就部署完毕了
版权属于:小杨的生活
本文链接:https://www.akkdiy.cn/archives/784/
转载时须注明出处及本声明
